


Bridge networking with QEMU based VM (KVM)
After learning how to create KVM based virtual machines, I had to figure out how to access them from a network interface, not only from a GUI. Turns out I had opened another can of worms.
As mentioned in my previous article, once you setup your QEMU/KVM virtual machine, you can only interact with it with a user interface, be it an opaque and arcane QEMU launch script, Gnome Boxes or virt-manager.
But unless your virtual machine runs with root permission (in the qemu:///system space), you will not be able to access it by any other mean. It is often underestimated the importance of running virtual machines as unprivileged user. The official Debian Wiki, for example, completely ignores this topic.
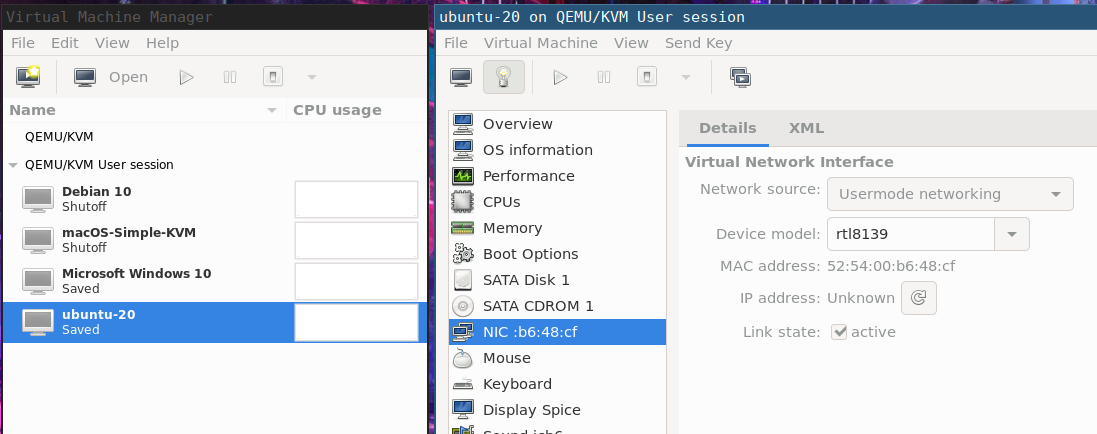
By default, a virtual machine will be created with a 'usermode' QEMU networking device:
Before explaining the solution, I'll try to sum up all the symptoms and cues to actually understand what's happening. I will describe either by using virsh (command-line tool) and virt-manager (the GUI tool), both great tools.
When you install QEMU and libvirtd you should have a default virtual network interface available, but only in the qemu:///system space. If you connect to the user space (qemu:///session), it's not there anymore.
$ virsh
virsh # net-list
 Name      State    Autostart   Persistent
--------------------------------------------
 default   active   yes         yes

virsh # net-info --network default
Name:           default
UUID:           c1e51079-7727-4c3d-846e-3179f56fe94f
Active:         yes
Persistent:     yes
Autostart:      yes
Bridge:         virbr0

virsh # connect qemu:///session

virsh # net-list
 Name   State   Autostart   Persistent
----------------------------------------

virsh #

You will notice that the virtual network bridge interface is virbr0 (vir-tual br-igde, if it helps) and assigns a DHCP address from a pool of a /24 class. More info can be obtained with:
$ brctl show
bridge name	bridge id		STP enabled	interfaces
virbr0		8000.52540099f456	yes		virbr0-nic
or
$ bridge link show virbr0
5: virbr0-nic: <BROADCAST,MULTICAST> mtu 1500 master virbr0 state disabled priority 32 cost 100
or
$ ip addr show virbr0
4: virbr0: <NO-CARRIER,BROADCAST,MULTICAST,UP> mtu 1500 qdisc noqueue state DOWN group default qlen 1000
    link/ether 52:54:00:99:f4:56 brd ff:ff:ff:ff:ff:ff
    inet 192.168.122.1/24 brd 192.168.122.255 scope global virbr0
       valid_lft forever preferred_lft forever
In case this network is not available it can be created by following instructions such as these or these.
The RedHat documentation explains how to create a bridge but lacks an important detail: how to use it with an unprivileged QEMU VM!
§ The problem
So, the current situation is that our VM can access the "internet" but is isolated from us. When you run your KVM guest as unprivileged user, you cannot use the default network bridge, no matter if your user belongs to the kvm or libvirt groups, it's simply impossible.
Again, from the libvirt documentation:
qemu:///session has a serious drawback: since the libvirtd instance does not have sufficient privileges, the only out of the box network option is qemu's usermode networking, which has nonobvious limitations, so its usage is discouraged.
Why is it discouraged? Basically because it's an unoptimized implementation of a tcp/ip stack in QEMU, here are some reasons why: in short, it's just a pass-through for the guest to access external resources.
§ host-to-guest networking
Your only chance to access the VM vithout going crazy creating subnetworks of fiddling with iptables (there are some answers around on this but I don't like them) is by using qemu-bridge-helper, as explained in this article.
With this missing piece of info in our hands, it's now easy to fix.
Note: as of July, 2020 the above article and the official documentation have some inaccuracies that are here fixed (along with some small optimizations).
Assuming that ipv4 forwarding has been enabled (see previous documentation):
$ cat /etc/sysctl.conf
...
net.ipv4.ip_forward = 1
...
and the virtual bridge virbr0 is enabled and autostarted (again, see above) we need to create this file:
# echo "allow virbr0" > /etc/qemu/bridge.conf
# chown root:kvm /etc/qemu/bridge.conf
# chmod 0660 /etc/qemu/bridge.conf
This file will set an ACL telling QEMU that the virbr0 interface should be whitelisted. By default all the rest is blacklisted (details here).
Then you should have installed qemu-bridge-helper, available in the qemu-system-common package (for Debian based Linux distributions). Ensure that it has the suid bit set:
# chmod u+s /usr/lib/qemu/qemu-bridge-helper
If you try starting your unprivileged VM without setting the suid bit, you will get a permission error:
Error starting domain: internal error: /usr/lib/qemu/qemu-bridge-helper --use-vnet --br=virbr0 --fd=24: failed to communicate with bridge helper: Transport endpoint is not connected stderr=failed to create tun device: Operation not permitted
Now you should be able to start your virtual machine and get to the console. Login and configure the networking device on the guest to ensure the DHCP is getting an address (how to do that is distro-specific, so I won't detail it here) and check what's going on the host:
$ journalctl -t dnsmasq-dhcp -f
-- Logs begin at Fri 2019-06-21 21:08:01 CEST. --
Jul 06 10:53:55 host dnsmasq-dhcp[1350]: read /var/lib/libvirt/dnsmasq/default.hostsfile
Jul 06 11:18:14 host dnsmasq-dhcp[1350]: DHCPDISCOVER(virbr0) 52:54:00:53:52:b1
Jul 06 11:18:14 host dnsmasq-dhcp[1350]: DHCPOFFER(virbr0) 192.168.122.62 52:54:00:53:52:b1
Jul 06 11:18:14 host dnsmasq-dhcp[1350]: DHCPREQUEST(virbr0) 192.168.122.62 52:54:00:53:52:b1
Jul 06 11:18:14 host dnsmasq-dhcp[1350]: DHCPACK(virbr0) 192.168.122.62 52:54:00:53:52:b1 guestvm
seems like guestvm is receiving an ip address! Let's go back to the guest.

Now we are able to access the guest (let's say we enable SSH on it) and the guest still have access to the world.
user@host$ ssh 192.168.122.62
user@192.168.122.62's password:
Linux guestvm 4.19.0-9-amd64 #1 SMP Debian 4.19.118-2+deb10u1 (2020-06-07) x86_64
user@nyarlathoep:~$